1、下载安装包:
http://archive.apache.org/dist/flume/1.9.0/
2、创建flume文件夹
mkdir /flume
3、上传安装包到flume文件夹下
cd /flume
rz
进行解压 tar -xzf apache-flume-1.9.0-bin.tar.gz
4、flume-env.sh环境变量配置
cd /flume/apache-flume-1.9.0-bin/conf
创建配置文件
cp flume-env.sh.template flume-env.sh
编辑配置文件
vi flume-env.sh
在flume-env.sh中添加
export JAVA_HOME=/usr/java/jdk1.8.0_221
5、配置flume文件系统环境变量
vi /etc/profile
在最后两行添加
export FLUME_HOME=/flume/apache-flume-1.9.0-bin
export PATH=$PATH:$FLUME_HOME/bin
使环境变量立即生效
source /etc/profile
6、配置flume采集方案
cd /flume/apache-flume-1.9.0-bin/conf
vi example.conf
插入内容:
agent.sources = s1
agent.channels = c1
agent.sinks = k1
# For each one of the sources, the type is defined
agent.sources.s1.type = netcat
agent.sources.s1.bind = localhost
agent.sources.s1.port = 44444
# The channel can be defined as follows.
agent.sources.s1.channels = c1
# Each sink's type must be defined
agent.sinks.k1.type = logger
#Specify the channel the sink should use
agent.sinks.k1.channel = c1
# Each channel's type is defined.
agent.channels.c1.type = memory
agent.channels.c1.capacity = 100
agent.channels.c1.transactionCapacity = 100
7、启动单个agent
flume-ng agent --conf conf --conf-file example.conf --name a1
8、再打开一个窗口
安装telnet
yum install -y telnet
执行 telnet localhost 44444
flume简介
flume安装
1、下载安装包:
http://archive.apache.org/dist/flume/1.8.0/
2、创建flume文件夹
mkdir /flume
3、上传安装包到flume文件夹下
cd /flume
rz
进行解压 tar -xf apache-flume-1.8.0-bin.tar.gz
4、flume-env.sh环境变量配置
cd /flume/apache-flume-1.8.0-bin/conf
创建配置文件
cp flume-env.sh.template flume-env.sh
编辑配置文件
vi flume-env.sh
在flume-env.sh中添加
export JAVA_HOME=/usr/java/jdk1.8.0_221
5、配置flume文件系统环境变量
vi /etc/profile
在最后两行添加
export FLUME_HOME=/flume/apache-flume-1.8.0-bin
export PATH=$PATH:$FLUME_HOME/bin
使环境变量立即生效
source /etc/profile
6、配置flume采集方案
cd /flume/apache-flume-1.8.0-bin/conf
vi example.conf
插入内容:
# Name the components on this agent
a1.sources = r1
a1.sinks = k1
a1.channels = c1
# Describeconfigure the source
a1.sources.r1.type = netcat
a1.sources.r1.bind = localhost
a1.sources.r1.port = 44444
# Describe the sink
a1.sinks.k1.type = logger
# Use a channel which buffers events in memory
a1.channels.c1.type = memory
a1.channels.c1.capacity = 1000
a1.channels.c1.transactionCapacity = 100
# Bind the source and sink to the channel
a1.sources.r1.channels = c1
a1.sinks.k1.channel = c1
7、启动单个agent
flume-ng agent --conf conf --conf-file example.conf --name a1
8、再打开一个窗口
安装telnet
yum install -y telnet
执行 telnet localhost 44444
1、下载安装包:
http://archive.apache.org/dist/flume/1.8.0/
2、创建flume文件夹
mkdir /flume
3、上传安装包到flume文件夹下
cd /flume
rz
进行解压 tar -xf apache-flume-1.8.0-bin.tar.gz
4、flume-env.sh环境变量配置
cd /flume/apache-flume-1.8.0-bin/conf
创建配置文件
cp flume-env.sh.template flume-env.sh
编辑配置文件
vi flume-env.sh
在flume-env.sh中添加
export JAVA_HOME=/usr/java/jdk1.8.0_221
5、配置flume文件系统环境变量
vi /etc/profile
在最后两行添加
export FLUME_HOME=/flume/apache-flume-1.8.0-bin
export PATH=$PATH:$FLUME_HOME/bin
使环境变量立即生效
source /etc/profile
6、配置flume采集方案
cd /flume/apache-flume-1.8.0-bin/conf
cp flume-conf.properties.template flume-conf.properties
vi flume-conf.properties
内容为:
agent.sources = seqGenSrc
agent.channels = memoryChannel
agent.sinks = loggerSink
# For each one of the sources, the type is defined
agent.sources.seqGenSrc.type = netcat
agent.sources.seqGenSrc.bind = localhost
agent.sources.seqGenSrc.port = 44444
# The channel can be defined as follows.
agent.sources.seqGenSrc.channels = memoryChannel
# Each sink's type must be defined
agent.sinks.loggerSink.type = logger
#Specify the channel the sink should use
agent.sinks.loggerSink.channel = memoryChannel
# Each channel's type is defined.
agent.channels.memoryChannel.type = memory
# Other config values specific to each type of channel(sink or source)
# can be defined as well
# In this case, it specifies the capacity of the memory channel
agent.channels.memoryChannel.capacity = 100
7、启动单个agent
flume-ng agent --conf conf --conf-file /flume/apache-flume-1.8.0-bin/conf/flume-conf.properties --name agent -Dflume.root.logger=INFO,console

8、crt再新打开一个192.168.1.4(1)窗口

(1)安装telnet软件包
yum -y install telnet
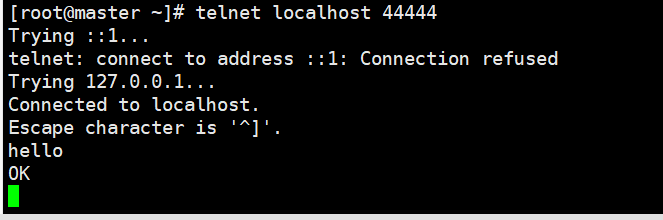
(2)执行Telnet命令
telnet localhost 44444
输入hello 然后回车

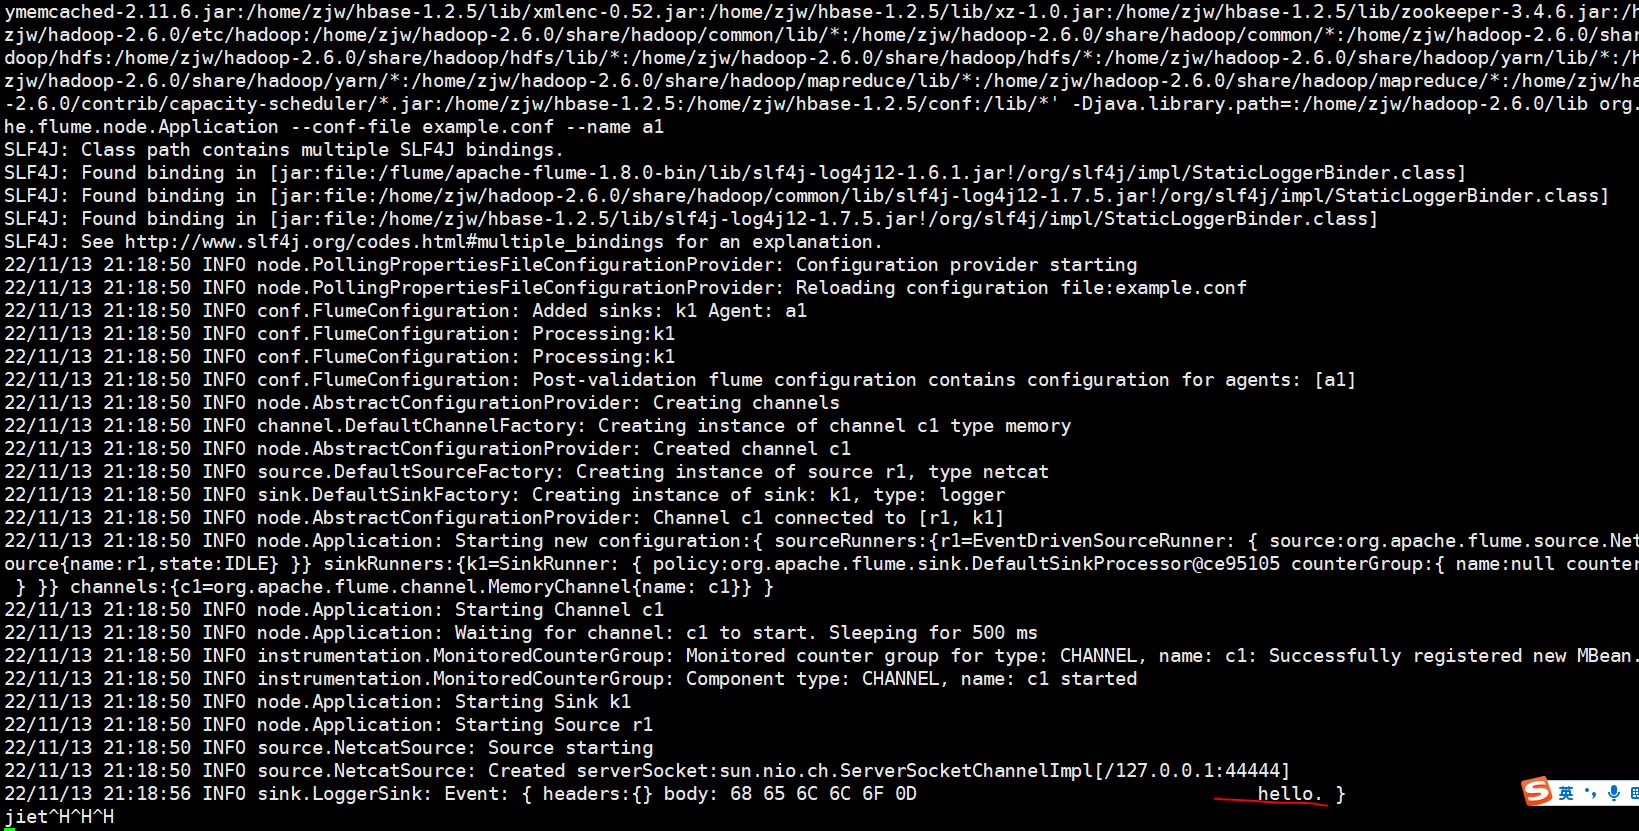
9、切换到原始的192.168.1.4节点
可以查看到flume采集到 刚才输入的hello信息

安装视频1: