-
1 学习目的
-
2 引导训练

学习目的
1.掌握Android终端高频RFID数据采集
2.掌握Android的UI应用程序开发
3.熟悉串口通信及应用开发
在智能门禁模块,首先对该模块进行初始化。用户可以对RFID卡进行设置。再录入用户RFID卡到数据库,完成用户注册。
在刷卡验证时,RFID阅读器采集用户指纹信息,并和指纹特征库进行对比,查看是不是用户。如果是,进一步确定是管理员还是普通用户身份,对其赋予相关权限。
(1)Android布局管理
关于View组件布局的方式,Android官方比较推荐使用XML布局的方式。布局管理器的分类有:线性布局管理器(LinearLayout);表格布局管理器(Table Layout);相对布局管理器(RelativeLayout);绝对布局管理器(AbsoluteLayout);帧布局管理器(FrameLayout)。
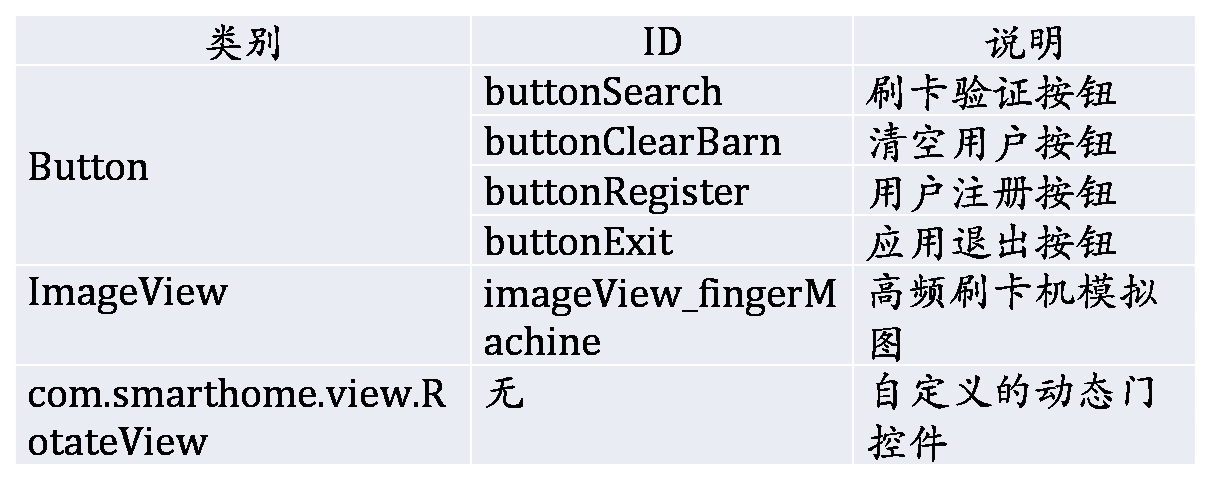
在Eclipse创建一个SmartHomeDemo工程,修改在res\layout目录下mail.xml布局资源,对其属性的说明
如表2-2所示。

表2-2 刷卡验证界面控件属性
²案例1:刷卡界面的线性布局实现
1.<LinearLayout
2. android:id="@+id/linearLayout3"
3. android:layout_width="fill_parent"
4. android:layout_height="fill_parent"
5. android:orientation="horizontal" >
6. <com. smarthome.view.RotateView
7. android:layout_width="262px"
8. android:layout_height="296px"
9. android:layout_marginLeft="70dp"
10. android:layout_marginTop="60dp" />
11. <ImageView
12. android:id="@+id/imageView_fingerMachine"
13. android:layout_width="wrap_content"
14. android:layout_height="wrap_content"
15. android:layout_marginLeft="70dp"
16. android:layout_marginTop="70dp“
17. android:src="@drawable/readcard" />
18. <LinearLayout
19. android:id="@+id/linearLayout1"
20. android:layout_width="match_parent"
21. android:layout_height="match_parent"
22. android:layout_gravity="right"
23. android:layout_marginRight="15dp"
24. android:layout_marginTop="1dp"
25. android:gravity="right"
26. android:orientation="vertical" >
27. <Button
28. android:id="@+id/buttonSearch"
29. android:layout_width="100dp"
30. android:layout_height="40dp"
31. android:gravity="center"
32. android:text="刷卡验证"
33. android:textSize="14dp" />
34. <Button
35. android:id="@+id/buttonSearchStop"
36. android:layout_width="100dp"
37. android:layout_height="40dp"
38. android:gravity="center"
39. android:text="中止操作"
40. android:textSize="14dp"
41. android:visibility="gone"/>
42. <Button
43. android:id="@+id/buttonClearBarn"
44. android:layout_width="100dp"
45. android:layout_height="40dp"
46. android:text="清空用户"
47. android:textSize="14dp" />
48. <Button
49. android:id="@+id/buttonRegister"
50. android:layout_width="100dp"
51. android:layout_height="40dp"
52. android:gravity="center"
53. android:text="用户注册"
54. android:textSize="14dp" />
55. <Button
56. android:id="@+id/buttonExit"
57. android:layout_width="100dp"
58. android:layout_height="40dp"
59. android:gravity="center"
60. android:text="退出"
61. android:textSize="14dp" />
62. </LinearLayout>
63. </LinearLayout>
(2)gif图片播放
在Android 中播放gif图片,用到了GifView类。首先,把GifView.jar加入到项目中;然后,在XML中配置GifView的基本属性。GifView继承自View类,和Button、ImageView一样,是一个UI控件。
案例2:gif图片播放的布局
1.<LinearLayout
2. android:id="@+id/linearLayout2"
3. android:layout_width="wrap_content"
4. android:layout_height="25dp"
5. android:layout_gravity="center"
6. android:layout_marginTop="40dp"
7. android:orientation="horizontal"
8. android:visibility="visible" >
9. <com.ant.liao.GifView
10. android:id="@+id/searchLoading"
11. android:layout_width="wrap_content"
12. android:layout_height="wrap_content"
13. android:layout_gravity="center" />
14. <TextView
15. android:id="@+id/textViewSearch"
16. android:layout_width="wrap_content"
17. android:layout_height="wrap_content"
18. android:layout_marginLeft="10dp"
19. android:gravity="center"
20. android:text="" />
21. <com.ant.liao.GifView
22. android:id="@+id/loading"
23. android:layout_width="wrap_content"
24. android:layout_height="wrap_content"
25. android:layout_gravity="center" />
26. <TextView
27. android:id="@+id/textViewMessage"
28. android:layout_width="wrap_content"
29. android:layout_height="wrap_content"
30. android:layout_marginLeft="10dp"
31. android:gravity="center"
32. android:text="" />
33. </LinearLayout>
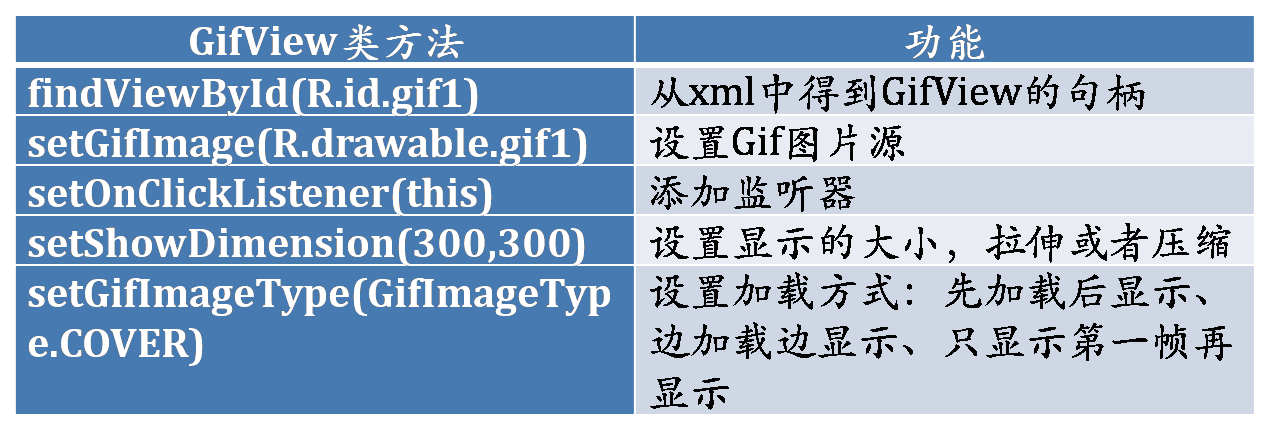
GifView类操作方法及功能如表2-5所示

表2-3GifView类操作方法及功能
案例3:gif图片播放的刷卡验证实现
// 注册用户
buttonRegister.setOnClickListener(new OnClickListener() {
public voidonClick(View v) {
String[]cardID = new String[1];
// 寻卡
if (hf.selectCard(1, cardID) < 0) {
Toast.makeText(Main.this, "读卡失败,请重试!", Toast.LENGTH_SHORT).show();
return;
}
if (myDatabaseUtils.registerdata(cardID[0]))
Toast.makeText(Main.this, "注册成功!", Toast.LENGTH_SHORT).show();
else
Toast.makeText(Main.this, "注册失败或当前用户卡已被注册!", Toast.LENGTH_SHORT).show();
}
});
//门禁刷卡
buttonSearch.setOnClickListener(new OnClickListener() {
public voidonClick(View v) {
String[]cardID = new String[1];
// 寻卡
if (hf.selectCard(1, cardID) < 0) {
Toast.makeText(Main.this, "读卡失败,请重试!", Toast.LENGTH_SHORT).show();
return;
}
if (myDatabaseUtils.selectdatabase(cardID[0])) {
dooropen =true;
}else{
Toast.makeText(Main.this, "此用户卡未注册", Toast.LENGTH_SHORT).show();
}
}
//清空数据库
buttonClearBarn.setOnClickListener(new OnClickListener() {
public voidonClick(View v) {
final AlertDialog.Builder builder = new AlertDialog.Builder(Main.this);
builder.setTitle("提示").setMessage("确定要清空所有的用户数据?")
.setCancelable(true).setPositiveButton("确定",
new DialogInterface.OnClickListener() {
public voidonClick(DialogInterface dialog, int id) { dialog.cancel(); if (myDatabaseUtils.deletealldata()) {
Toast.makeText(Main.this, "清空用户数据成功!", Toast.LENGTH_SHORT).show();
}else{ Toast.makeText(Main.this, "清空用户数据失败!", Toast.LENGTH_SHORT).show();
}
}
})
.setNegativeButton("取消",
new DialogInterface.OnClickListener() {
public voidonClick(DialogInterface dialog, int id) {
dialog.cancel();
}
});
AlertDialogalert= builder.create();
alert.show();
}
});
//退出
buttonExit.setOnClickListener(new OnClickListener() {
public void onClick(View v) {
exit();
}
});
}
SQLite数据库操作代码实现
Android在运行时(run-time)集成了SQLite,所以每个Android应用程序都可以使用SQLite数据库。对于熟悉SQL的开发人员来时,在Android开发中使用SQLite相当简单。但是,由于JDBC会消耗太多的系统资源,所以JDBC对于手机这种内存受限设备来说并不合适。因此,Android提供了一些新的API来使用SQLite数据库,Android开发中,程序员需要学使用这些API。数据库存储在data/<项目文件夹>/databases/下。
onCreate(SQLiteDatabase)方法,它需要一个SQLiteDatabase对象作为参数,根据需要对这个对象填充表和初始化数据。
onUpgrage(SQLiteDatabase,int,int)方法,它需要三个参数,一个SQLiteDatabase对象,一个旧的版本号和一个新的版本号,这样你就可以清楚如何把一个数据库从旧的模型转变到新的模型。 onOpen(SQLiteDatabase):这是当打开数据库时的回调函数,一般也不会用到。
案例4:SQLite操作initdatabase方法的实现
try {
System.out.println(databasepath);
databasefile.createNewFile();
} catch (IOException e1) {
e1.printStackTrace();
}
InputStreaminputStream = null;
FileOutputStreamoutputStream = null;
try {
inputStream = activity.getResources().getAssets()
.open(databasename);
} catch (IOException e) {
e.printStackTrace();
}
try {
outputStream = new FileOutputStream(databasepath + databasename);
} catch (FileNotFoundException e) {
e.printStackTrace();
}
byte[] buffer = new byte[1024];
intlength;
try {
while ((length = inputStream.read(buffer)) > 0) {
outputStream.write(buffer, 0, length);
buffer = new byte[1024];// 一次写入128B的数据
System.out.println("write over!");
}
} catch (IOException e) {
e.printStackTrace();
}
try {
outputStream.flush();
} catch (IOException e) {
e.printStackTrace();
}
try {
outputStream.close();
} catch (IOException e) {
e.printStackTrace();
}
try {
outputStream.close();
} catch (IOException e) {
e.printStackTrace();
}
sqLiteDatabase = null;
sqLiteDatabase = SQLiteDatabase.openDatabase(databasepath
+ databasename, null, SQLiteDatabase.OPEN_READWRITE);
Toast.makeText(activity, "位于本地的数据库初始化完成!", Toast.LENGTH_LONG).show();
}
sqLiteDatabase = SQLiteDatabase.openDatabase(databasepath
+ databasename, null, SQLiteDatabase.OPEN_READWRITE);
return sqLiteDatabase;
案例5:SQLite操作registerdata方法的实现
public booleanregisterdata(String data) {
booleanissuccess = false;
if (sqLiteDatabase != null) {
try {
if (!selectdatabase(data)) {
ContentValuesmyContentValues = new ContentValues();
myContentValues.put("USERSCARD_ID", data);
sqLiteDatabase.insert("USERSCARD", null, myContentValues);
issuccess = true;
} else
issuccess = false;
} catch (Exception e) {
issuccess = false;
}
}
return issuccess;
}
案例6:SQLite操作selectdatabase方法的实现
public booleanselectdatabase(String dataforselect) {
booleanisSuccess = true;
if (sqLiteDatabase != null) {
Cursor cursor;
String str_sql ="select * from USERSCARD where USERSCARD_ID = '"
+ dataforselect + "'";
cursor = sqLiteDatabase.rawQuery(str_sql, null);
if (cursor.moveToFirst())
isSuccess = true;
else
isSuccess = false;
if (cursor != null) {
cursor.close();
}
}
return isSuccess; }
案例7:SQLite操作deletealldata方法的实现
public booleandeletealldata() {
if (sqLiteDatabase != null) {
String str_sql ="delete from USERSCARD";
sqLiteDatabase.execSQL(str_sql);
return true;
}
return false;
}
案例8:SQLite操作closedatabase方法的实现
public void closedatabase() {
try {
sqLiteDatabase.close();
} catch (Exception e) {
}
}
案例9:HighRFID类的读写数据方法的实现
在SmartHomeDemo工程的HighRFID类中,添加如下方法。
public intwriteData(int block, String data)
{
char cData[]= Convert.stringTo16CharArray(data);
char command[] = new char[24];
command[0] = '\002';
command[1] = '\0';
command[2] = '\023';
command[3] = '3';
command[4] = '(';
command[5] = (char)block;
for (inti = 0; i < 16; i++)
command[i + 6] = cData[i];
command[22] = getLRC(command);
command[23] = '\003';
intresult = -1;
String recdata =getCmdReturn(command);
if (recdata!= null && recdata.length() >= 5)
result = recdata.charAt(4);
return result;
}
public intreadData(int block, Stringdata[])
{
char command[] = new char[8];
command[0] = '\002';
command[1] = '\0';
command[2] = '\003';
command[3] = '3';
command[4] = '\'';
command[5] = (char)block;
command[6] = getLRC(command);
command[7] = '\003';
intresult = -1;
String recdata =getCmdReturn(command);
if (recdata!= null && recdata.length() >= 23)
{
result = recdata.charAt(4);
if (recdata.charAt(3) == 0 &&result == 0)
data[0] = Convert.dataToString(recdata.substring(5, 21));
}
return result;
}
案例10:HighRFID类的寻卡、密钥验证方法的实现
在SmartHomeDemo工程的HighRFID类中,添加如下方法。
public intselectCard(int time, String cardID[])
{
char command[] = new char[10];
command[0] = '\002';
command[1] = '\0';
command[2] = '\005';
command[3] = '3';
command[4] = '!';
command[5] = 'R';
command[6] = '\0';
command[7] = (char)time;
command[8] = getLRC(command);
command[9] = '\003';
intresult = -1;
String data = getCmdReturn(command);
if (data != null && data.length() >= 12)
{
char c1 = data.charAt(3);
char c2 = data.charAt(4);
result = c2;
if (c1 == 0 && c2 == 0)
{
cardID[0]= data.substring(9, 13);
CardID =cardID[0].toCharArray();
cardID[0]= Convert.dataToHexString(cardID[0]);
}
if (c1 == '0' && c2 == '\001')
result = 4;
}
return result;
}
public inthaltCard()
{
char command[] = {
'\002', '\0', '\002', '3', '"', '\021','\003'
};
intresult = -1;
String data = getCmdReturn(command);
if (data != null && data.length() >= 5)
result = data.charAt(4);
return result;
}
public intdownloadKey(int block)
{
char command[] = new char[9];
command[0] = '\002';
command[1] = '\0';
command[2] = '\004';
command[3] = '3';
command[4] = '$';
command[5] = '`';
command[6] = (char)block;
command[7] = getLRC(command);
command[8] = '\003';
intresult = -1;
String data = getCmdReturn(command);
if (data != null && data.length() >= 5)
result = data.charAt(4);
return result;
}
public intauthenticationDownloadKey(int block)
{
char command[] = new char[13];
command[0] = '\002';
command[1] = '\0';
command[2] = '\b';
command[3] = '3';
command[4] = '%';
command[5] = '\0';
for (inti = 0; i < 4; i++)
command[i +6] = CardID[i];
command[10] = (char)block;
command[11] = getLRC(command);
command[12] = '\003';
intresult = -1;
String data = getCmdReturn(command);
if (data != null && data.length() >= 5)
result = data.charAt(4);
return result;
}
public intauthenticationExternKey(int block, String key)
{
char cKey[]= {
'\377', '\377', '\377', '\377', '\377', '\377'
};
char command[] = new char[19];
command[0] = '\002';
command[1] = '\0';
command[2] = '\016';
command[3] = '3';
command[4] = '&';
command[5] = '`';
for (inti = 0; i < 4; i++)
command[i +6] = CardID[i];
command[10] = (char)block;
for (int j= 0; j < 6; j++)
command[j + 11] = cKey[j];
command[17] = getLRC(command);
command[18] = '\003';
intresult = -1;
String data = getCmdReturn(command);
if (data != null && data.length() >= 5)
result = data.charAt(4);
return result;
}
案例11:打开和关闭RFID设备的串口连接
在SmartHomeDemo工程的SerialPort类中,添加如下方法。
public intopenPort(int port, int mode, intbaudRate) {
intcom_fd = -1;
try {
com_fd =Linuxc.openUart(port, mode);
if (com_fd> 0) {
intstatus = Linuxc.setUart(com_fd, (char) baudRate);
if (mode == 3)
status = 1;
if (status > 0) {
return com_fd;
}
}
}
catch (Exception e) {
com_fd =-1;
}
return com_fd;
}
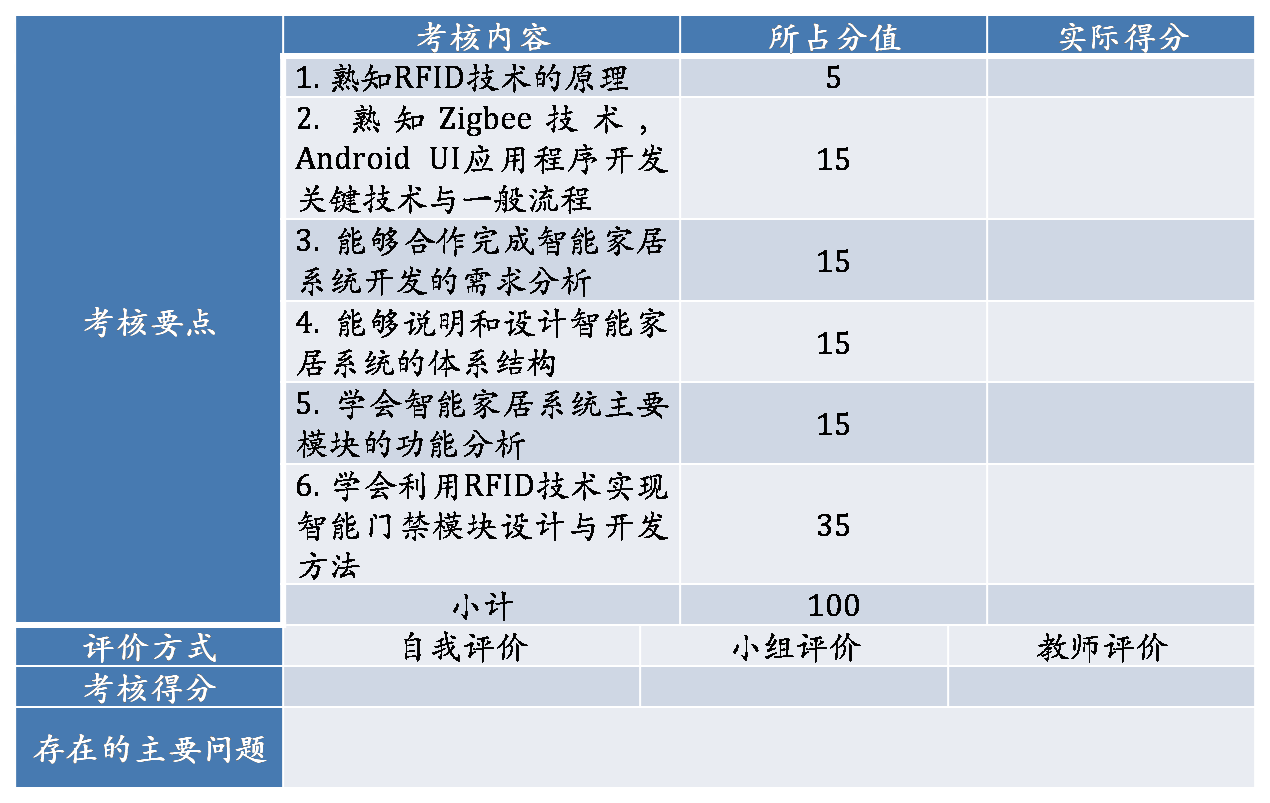
引导训练与考核评价
表2-4 “引导训练”考核评价表


