(1)位置服务的实现
位置服务一般都需要使用设备上的硬件,最理想的调试方法是将程序上传到物理设备上运行;但在没有物理设备的情况下,也可以使用Android模拟器提供的虚拟方式模拟设备定位位置变化,调试具有位置服务的应用程序。
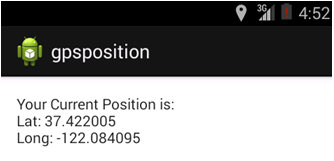
在程序运行过程中,可以在模拟器控制器中改变经度和纬度坐标值。程序在检测到位置的变化后,会将最新的位置信息显示在界面上。
案例5:位置服务的实现-主要代码
MainActivity.java:
1. package com. example. gpsposition;
2. import android.app.Activity;
3. import android.contect.Context
4. import android.os.Bundle;
5. import android.widget.TextView;
6. import android.location.Location;
7. import android.location.LocationListener;
8. import android.location.LocationManager;
9. public class MainActivity extends Activity {
10. @Override
11. publicvoid onCreate(Bundle savedInstanceState) {
12. super.onCreate(savedInstanceState);
13. setContentView(R.layout.activity_main);
14. StringserviceString = Context.LOCATION_SERVICE;// 指明获取的服务是位置服务
15. LocationManagerlocationManager = (LocationManager)getSystemService(serviceString);// 获取Android提供的位置服务
16. Stringprovider = LocationManager.GPS_PROVIDER;//指定利用GPS定位获取当前位置
17. Locationlocation = locationManager.getLastKnownLocation(provider);// Location对象 中,包含了可以确定位置的信息,如经度、纬度和速度等
18. getLocationInfo(location); //获取当前位置信息
19. locationManager.requestLocationUpdates(provider, 2000, 0, locationListener);// 位置监视方法,可以根据位置的距离变化和时间间隔设定产生位置改变事件的条件。第1个参数是定位的方法,GPS定位或网络定位;第2个参数是产生位置改变事件的时间间隔,单位为微秒;第3个参数是距离条件,单位是米;第4个参数是回调函数,在满足条件后的位置改变事件的处理函数。
20. }
21. //获取当前位置的经纬度信息函数
22. privatevoid getLocationInfo(Location location){
23. StringlatLongInfo;
24. TextViewlocationText = (TextView)findViewById(R.id.txtshow);
25. if(location != null){
26. doublelat = location.getLatitude();
27. doublelng = location.getLongitude();
28. latLongInfo = "Lat: " + lat + "\nLong: " + lng;
29. }
30. else{
31. latLongInfo = "No location found";
32. }
33. locationText.setText("Your Current Positionis:\n" + latLongInfo);
34. }
35. //在满足条件后的位置改变事件的处理函数
36. privatefinal LocationListenerlocationListener = new LocationListener(){
37. @Override
38. //在设备的位置改变时被调用
39. publicvoid onLocationChanged(Location location) {
40. getLocationInfo(location);
41. }
42. @Override
43. //在用户禁用具有定位功能的硬件时被调用
44. public void onProviderDisabled(String provider) {
45. getLocationInfo(null);
46. }
47. @Override
48. //在用户启用具有定位功能的硬件时被调用
49. public void onProviderEnabled(String provider) {
50. getLocationInfo(null);
51. }
52. @Override
53. //在提供定位功能的硬件的状态改变时被调用,如从不可获取位置信息状态到可以获取位置信息的状态,反之亦然
54. public void onStatusChanged(String provider, int status, Bundle extras) { 55. }
56. };
57. }
Activity_main.xml布局文件:
1. <RelativeLayoutxmlns:android="http://schemas.android.com/apk/res/android"
2. xmlns:tools="http://schemas.android.com/tools"
3. android:layout_width="match_parent"
4. android:layout_height="match_parent"
5. android:paddingBottom="@dimen/activity_vertical_margin"
6. android:paddingLeft="@dimen/activity_horizontal_margin"
7. android:paddingRight="@dimen/activity_horizontal_margin"
8. android:paddingTop="@dimen/activity_vertical_margin"
9. tools:context=".MainActivity" >
10. <TextView
11. android:layout_width="wrap_content"
12. android:layout_height="wrap_content"
13. android:id="@+id/txtshow"
14. android:text=""
15. />
16. </RelativeLayout>
代码运行的结果如图所示:

当前GIS位置信息显示结果
(2)申请Google地图密钥
在android平台上,Google Map android API V1版本申请和使用地图密钥的简要步骤:
(1)找到DebugKeyStore的存放位置,运行keytool命令把证书生成MD5认证指纹;
(2)打开http://code.google.com/intl/zh-CN/android/maps-api-signup.html,填入认证指纹(MD5)获得apiKey;
(3)在MapView中使用apiKey,在layout中加入MapView,并将申请获得的密钥添加;
(4)加上GoogleMap运行时的网络访问的权限,并将Uses-library包导入开发工具。
案例6:在Android系统中开发Google Map显示和标记程序-主要代码
创建Android工程,修改/res/layout/ activity_main.xml文件,在布局中加入一个fragment声明,MapFragment是Fragment的一个子类。
activity_main.xml布局文件的主要代码如下:
1. <fragment
2. xmlns:android:id="http://schemas.android.com/apk/res/android"
3. xmlns:map="http://schemas.android.com/apk/res-auto"
4. android:id="@+id/map"
5. android:layout_width="match_parent"
6. android:layout_height="match_parent"
7. class="com.google.android.gms.maps.MapFragment"/>//API 12以下的版本SupportMap
Fragment
V2版本的Google地图显示不需要继承MapActivity,使用MapFragment,只要安装GooglePlay Service 并且API版本在12以上就可以了。
MainActivity.java文件的主要代码:
1. public class MainActivity extends FragmentActivity {
2. private GoogleMap googleMap;
3. @Override
4. protected void onCreate(Bundle savedInstanceState) {
5. super.onCreate(savedInstanceState);
6. setContentView(R.layout.activity_main);
7. int status = GooglePlayServicesUtil.isGooglePlayServicesAvailable (getBaseContext());
8. if (status != ConnectionResult.SUCCESS) {
9. int requestCode = 10;
10. Dialog dialog = GooglePlayServicesUtil.getErrorDialog(status,this,requestCode); dialog.show();
11. }
12. else {
13. MapFragment fm = (MapFragment) getFragmentManager().findFragmentById
(R.id.mapview);
14. googleMap = fm.getMap();
15. LatLng sfLatLng = new LatLng(-43.507227, 172.72233);
16. googleMap.moveCamera(CameraUpdateFactory.newLatLng(sfLatLng));//设置初始化地图的 位置
17. if (googleMap != null) {
18. googleMap.setMapType(GoogleMap.MAP_TYPE_NORMAL); //设置地图类型为Normal
19. googleMap.getUiSettings().setCompassEnabled(true); //一些地图的界面元素设置
20. googleMap.getUiSettings().setZoomControlsEnabled(true);
21. googleMap.getUiSettings().setMyLocationButtonEnabled(true);
22. googleMap.addMarker(new MarkerOptions().position(sfLatLng).title("New Brighton")
.snippet("New Brighton").icon(BitmapDescriptorFactory.defaultMarker
(BitmapDescriptor-Factory.HUE_AZURE)));
23. googleMap.moveCamera(CameraUpdateFactory.newLatLngZoom(sfLatLng, 15));
24. googleMap.animateCamera(CameraUpdateFactory.zoomIn());
25. googleMap.animateCamera(CameraUpdateFactory.zoomTo(10), 2, null);
26. }
27. }
28. }
29.
30. @Override
31. public boolean onCreateOptionsMenu(Menu menu) {
32. //填充设计的menu
33. getMenuInflater().inflate(R.menu.main, menu);
34. return true;
35. }
36. }
由于获取Google地图是需要使用互联网的,所以在运行前还需要在AndroidManifest.xml文件中,添加允许访问互联网等的许可,一些权限设置也要添加。另外,申请的Google map key需要添加在application中。
AndroidManifest.xml文件中包含的主要内容如下:
1. //在<application>元素中加入子标签:
2. <meta-data
3. android:name="com.google.android.maps.v2.API_KEY"
4. //填写你申请的Googlemap key
5. android:value="AIzaSyAHM9QaSkm5U0O5AWUQxTy39a3SQUKbGvA"
6. />
7. //加入各种许可信息:
8. <permission
9. android:name="com. google_maps.permission.MAPS_RECEIVE"//包名一致
10. android:protectionLevel="signature"
11. />
12. <uses-permission
13. android:name="com.google_maps.permission.MAPS_RECEIVE"/> //替换包名
14. <uses-permission android:name="android.permission.INTERNET"/>
15. <uses-permission android:name="android.permission.WRITE_EXTERNAL_STORAGE"/>
16. <uses-permission android:name="com.google.android.providers.gsf.permission.READ_
GSERVICES"/>
17. <uses-permissionandroid:name=" android.permission.ACCESS_COARSE_LOCATION"/>
18. <uses-permissionandroid:name=" android.permission.ACCESS_FINE_LOCATION"/>
19. //加入OpenGLES V2特性的支持:
20. <uses-feature
21. android:glEsVersion="0x00020000"
22. android:required="true"
23. />
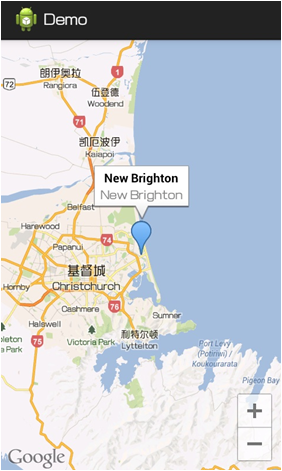
运行代码如图所示:

运行结果图


